Who is this for? For various teams or individuals who are responsible for optimizing ad campaigns to improve their performance, which includes identifying new keywords to target.
Objective: To increase the visibility of a product on the Walmart Marketplace and drive more traffic to a product listing.
Instructions:
Step 1. Log in to Walmart's advertising account. Go to https://advertising.walmart.com/signin/

- If your Walmart seller account is already linked to your Walmart advertising account you can simply click the Ad Center on the top when you are logged in to your Walmart seller account.
Step 2. Access your campaigns, to see live campaigns, performance, and the ability to edit bids.

Step 3. The Next Step is to optimize your bids. Just as you would on Amazon you want to sort your campaigns by spending to see where the performance and spending are, and that way you can optimize your campaigns.

Then go into each campaign and focus on the keywords, bids, and optimizations as you would on Amazon.
For this example we will go into the SP - Broad - SP - Broad - MAG Campaign
Step 1A: Click on the Campaign Name
Step 1B: Click on Edit Campaign

Step 1C:
- Identify your budgets.
- Modifiers
- Placements
- And then you can make changes to the actual bids in the AD Groups section.

Step 1D: Edit Keywords
- Click edit next to ad groups
- Next, click edit next to the ad group name.

- Next, you will see three fields:
- Details = Ad Group Name
- Content = Products being Advertised
- Keywords = Keywords being targeted
- Click Edit next to Keywords to Edit Keywords being targeted Against. And then click on the Bidded Keywords tab.

- Now you can adjust bids, add new phrases or exact bids (this campaign is only broad), etc.
- You can also view suggested keywords or add additional keywords on the additional keywords tab.
Performance:
Walmart does not allow you to see performance per keyword on the Bidded keywords tab, so you must view performance on the reports tabs on a more macro view. See the article below for more information.
https://advertisinghelp.walmart.com/s/guides?channel=Sponsored%20Products&article=000008390
- Follow the same process as above, but in this case, the only edit you can make is the CPC (MAX BID) and budget for the auto campaign as shown below.

Creating New Manual Campaigns on Walmart Marketplace
Step 1: Access the Campaigns Tab

Step 2: Click Create New Campaign

Step 3. Choose your bidding type (Manual or Automatic) as shown below.

Step 4: Choose Manual Bidding and Click Next
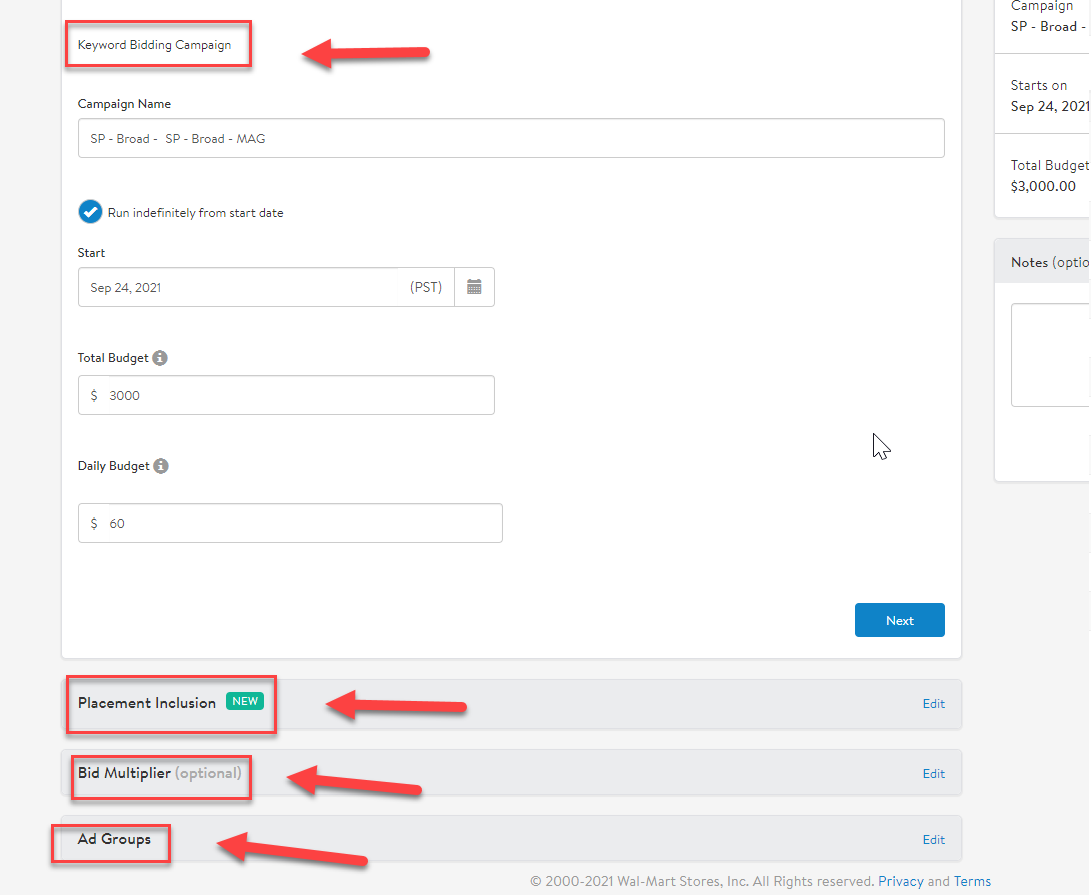
Step 5: Name your campaign.
Step 6: Set Daily Budget, and Total Budget (The MAX Amount the campaign will EVER spend) then click next.

Step 7: Placement Inclusion: https://advertisinghelp.walmart.com/s/guides?channel=Sponsored%20Products&article=000009457
If you've created a Manual campaign, you will have the option to include additional placement options.
Placement Inclusion
The Placement Inclusion section will provide you with the option to promote your items on Search Carousel, Item Buy Box, and Item Carousel ad placements for the keywords you’re bidding on, in addition to the Search in-grid.
By default, the Search Carousel placement is toggled on for all newly created campaigns. The Search In-grid placement cannot be toggled off.
Note: The inclusion of additional placements is optional but is highly recommended to expand reach.

Placement Types
Search In-grid
This is the default placement for Manual campaigns. When a shopper searches for a query and you are bidding on that keyword/match type, your item may be eligible to serve on the Sponsored Product In-grid placements within the search results
Search Carousel
When a shopper searches for a query and you are bidding on that keyword/match type, your item may be eligible to serve on the Sponsored Product Carousel placement below the search results.
Note: This placement is toggled on by default for all newly created campaigns, but can be toggled off at any time.
Item Buy Box & Item Carousel
When a shopper lands on an item page and you are bidding on a keyword/match type of one of the anchor item entities, your item may be eligible to serve on the Sponsored Products Buy Box and/or Carousel placement on the item page.
An anchor item is an item page/product detail page where you want your ads to appear. The following are considered anchor item entities:
- Item Title
- Item Brand
- Item Taxonomy
Below is an example of an anchor item, the anchor item entities, and possible keywords to target:

- Anchor item: 207703541
- Anchor item entities:
- Item Title - Age of Sage White Sage Smudge Sticks 4" Long
- Item Brand - Age of Sage
- Item Taxonomy - Home/Decor/Candles & Home Fragrance/Incense
- Possible keywords to target:
- Age of Sage
- Age of Sage White Sage Smudge Sticks 4" Long
- Age of Sage Home Decor
- Home/Decor/Candles & Home Fragrance/Incense
Match-type definitions for Item Page placements
- Exact Match - all the words in the Bidded keywords (or their normalized version) should be present in the same order and should be continuous (except for stop words or functional words). There cannot be any additional words in the entity.
- Age of Sage
- Home Decor
- Age of Sage White Sage Smudge Sticks 4" Long
- Candles & Home Fragrance
- Incense
- Phrase Match - all the words in the Bidded keywords (or their normalized version) can be in any order, however, all the words should be in one entity and should be continuous. There can be any additional words in the entity before and after the bidding keywords.
- Age of Sage Smudge Sticks
- White Sage Smudge Sticks Candles & Home Fragrance
- Candles Incense
- 4 Inches Long Incense
- Broad Match - all the words in the Bidded keywords (or their normalized version) can be present in any order and do not need to be continuous.
- Home Decoration
- Home Fragrance
- Household Cleansing
- Candles
- Incense
How to use keywords and match types to target item placements
Example 1 - If you want to target shampoo item pages but are unsure of which item(s) to specifically target:
- Start by targeting item pages based on their taxonomy using broad or phase match. It could be any level of the hierarchy such as "beauty", "hair care", or "beauty hair care"
- Use the On-demand Keyword Performance Report to identify the item pages your ads appeared on and performed well. Narrow match-types and/or target specific item entities to specifically target those pages.
Example 2 - If you know which item pages you want to target
- Use the item title of the targeted item page as the Bidded keyword with an exact match, such as "Age of Sage Everyday Clean Dandruff Shampoo, 33.8 fl oz."
- Alternatively, use "Equate Everyday" as the Bidded keyword with a phrase or broad match to target any/all items that contain the keyword in their item title such as
- Age of Sage Everyday Clean Dandruff Shampoo, 23.7 fl oz.
- Age of Sage Everyday Clean 2 in 1 Dandruff Shampoo & Conditioner, 13.5 fl oz.
- Age of Sage 14.2 Fl. Oz. Everyday Clean Dandruff Shampoo
- Age of Sage 2N1 Everyday Clean Dandruff Shampoo & Conditioner, 32.1fl oz.
Example 3 - Target your item pages to ensure competitor ads are not appearing
- Use the item brand of your items as the Bidded keyword to target all the items pages under your brand, such as "equate" with exact match
Once you have made your decision to opt into additional placements or not, click the Next button to save your selections and proceed to the next section.
Learn more about keyword bidding on the item page below:
Step 8: Create Ad Groups
Relevant to: 
After you have selected your campaign targeting preference, provided details and budgets, and added a Bid Multiplier (optional), you are now ready to create an Ad Group.
Start by pressing the Add New Ad Group button and enter your Ad Group name.


Important tips
- Each campaign must have at least one Ad Group
- Each Ad Group can have a maximum of 2,000 items
- Your bidding strategy is determined at the Campaign level. For example, a Manual campaign will only have Keyword Bidding Ad Groups
- You will be able to enable/disable an Ad Group after the campaign has started
Recommendations to set up your Ad Group(s) for success
- Automatic campaign:
- Cluster similar products together to enable you to track performance accordingly.
- Manual campaign:
- Create Ad Groups for products with similar attributes and related keywords.
- Include no more than 50-100 products per Ad Group
- Organize groups by related keywords, brands, product categories, and top sellers, so all products can be found via search easily.
- Choose a naming convention that is easily relatable to items in the Ad Group
- Continuously check Ad Group performance reports to optimize campaigns
Once you have entered an ad group name, click the Next button.
Step 9: Add items to an Ad Group
The Content section is where you will add the items you wish to advertise to your Ad Group.

Adding items to your Ad Group
You can add items to your Ad Group in three different ways:
- Upload a set of items in a CSV file
- Search for items by item ID
- Search for items by product name, keywords, or brand name
Note: Sponsored Products only allow you to advertise base item IDs. During the item setup process, one item is classified as a base item and any variations to that item are considered variants. If you don’t know what the base item ID is for an item(s), please reach out to us.
1. Upload a set of items in a CSV file
Before uploading your CSV file, we encourage you to download the CSV template by clicking on the Download CSV Template button.
Once you have downloaded the template, you will need to fill out the required fields below:
- Item ID - Input your base item ID
- CPC - Enter the CPC amount you wish to bid on the item
- Status - To enable an item, you can either enter "Enabled" or leave the field blank. If you wish to disable an item, enter "Disabled."

Note:
- CPC bids must be less than $20 and no more than two decimal places
- A maximum of 2,000 items are allowed per Ad Group
Once you have filled out and saved your CSV file, click on the Upload CSV button to upload your CSV file and the items/bids will be added to your Ad Group.
2. Search for items by entering their item ID
Click on the Add New Item button. In the pop-up, enter the item ID(s) on the item(s) you wish to promote into the search bar.
Once the list populates, select your desired item to add it to your Ad Group. To select all, click on Select All at the top of the column.

3. Search for items by product name, keyword, and/or brand name
Click on the Add New Item button. In the pop-up, enter product names or keywords/brands (e.g., headphones, drone, dining table, etc.) of items in your catalog into the search bar. You can also click on the Brands dropdown menu below the search bar to narrow down the results.
Once the list populates, select your desired item to add that item to your Ad Group. To select all, click on Select All at the top of the column.

Editing items in your Ad Group
Once you’ve uploaded or selected the items you wish to promote, you’ll see all the items you have added to your Ad Group.
From here, you can enable/disable items, remove items, and update CPCs. If you wish to update all of your items' CPCs at once, enter the amount desired in the Update all CPCs field and click outside the field to save your changes.
Note: During the initial setup of your campaign, you will have the option to delete items. Once your campaign goes live, you will not have the option to delete items, but they can be disabled if you no longer wish to promote them.

Searching for items in your Ad Group
Once the items have been added, you can use the search bar to look for existing items and modify single or multiple items. You will be able to change CPCs, enable/disable, or delete items.
Use the following options to narrow your search results:
- By item ID – partial or full
- By name – a single word or full name

Saving your Ad Group and starting your campaign
Once you have added all your items and adjusted all your bids, you will need to save your Ad Group by clicking on the Save button at the top of the page.

After saving your Ad Group, you will be taken back to the Campaign section to make any final changes. Once you are satisfied with the setup of your campaign, click on the Schedule Campaign button at the top of the page to start your Automatic campaign. If you’re not ready to start your campaign, you can click on the Finish Later button to save your campaign as a draft.

If you created a Manual Campaign
The CPC option will not be present in the Content section (as seen in the example below). You will instead be assigning CPC values to individual keywords and match types in the next section. Once you have added all of your items, click the Next button to proceed to the next section.

Step 10: Add and Select Keywords:
https://advertisinghelp.walmart.com/s/guides?channel=Sponsored%20Products&article=000008383
Optimization Guide: https://advertisinghelp.walmart.com/s/guides?channel=Sponsored%20Products&article=000009183
Campaign Setup Best Practices: https://advertisinghelp.walmart.com/s/guides?channel=Sponsored%20Products&article=000009181
First 30 Days: https://advertisinghelp.walmart.com/s/guides?channel=Sponsored%20Products&article=000009687
Opening a Case:
https://advertisinghelp.walmart.com/s/guides?channel=Sponsored%20Products&article=000009631
