Overview
This article covers configuration options available for your Shipbridge account. Additionally, you can further configure Shipbridge-related options and Security Settings on the Shipping Preferences page of your Company in Sellercloud.
Access Shipbridge Options
Shipbridge’s configuration options are organized into several sub-tabs:
- General
- Connection
- Invoice
- Shipping
- Batches
- Customs
- Carriers
- Shipsurance
- Scan and Ship
- Rates
To access these sub-tabs, click Menu > Options.
Learn how to configure the settings in each tab below.

General Tab
To open the General tab, go to Menu > Options > General. Here, you can configure a number of settings.
Default Shipping Method
When no specific shipping method is requested for an order, you can set a default carrier. Typically, a company will have a standard shipping method to fall back on. This default should include options for both domestic and international shipping, and for both general and rush orders.

You can easily set the default services per shippers here:
Default Shipping Services
You can easily set the Shipbridge default shipping services to ignore the shipping templates set on the orders in Sellercloud.
Other settings
| SETTING |
DESCRIPTION |
| Always show all relevant services in the grid |
All possible carriers that can be used for an order will appear when this setting is enabled. |
| Use upper-case mode in customer information |
Customer names/addresses will start with uppercase and continue with lowercase even if they are entered in another way. |
| Use strict order ID filtering |
This setting is for the Order ID filter (grid). When disabled, the filter will show results for partial “order IDs” (e.g. 123 will match 1234, 12309, etc.). When enabled, the filter wi;; show only the matching order IDs. |
| Enable multi-package support |
This setting allows orders to be shipped in multiple packages. |
| Notify of new/hidden orders |
If enabled, you will see a notification when new orders are imported. |
| Requires login at startup |
Typically, once your login details are set, you are not required to log in every time you start Shipbridge. When enabled, this setting will require login credentials on every application start. |
| Enable ‘Shipped Tab’ |
When enabled, you will see a tab with shipped orders. |
| Suppress “Corrupted order” error message |
When enabled, no error messages will be shown when some field info in the order is corrupted (e.g., address). |
| Show address validation PIN error |
Checks if the postal code is correct for a given address. |
| Show Mark Order as “Pending Address Correction” option |
Will mark any orders that need address correction. |
| Enable invoice counter |
Enabling this option causes Shipbridge to print an invoice count number on each invoice that is printed on any given day. |
| Display item condition |
Displays the condition of a selected product (New, Refurbished, etc.). |
| Hide the customer note tab |
This setting controls the visibility of the customer notes tab. |
| Auto download new orders every (minutes) |
This action is set to five minutes by default. You can lower it to one minute. |
| Only update the shipping status of orders in the grid |
Updates the status of orders included in the grid. |
| Refresh the orders loaded in the grid |
If enabled, only the order already loaded in the grid will be updated. |
| Preserve weights |
When enabled, will prompt you to enter a note into a pop-up window. |
| Use Per Quantity Shipping Preferences |
When checked, Shipbridge uses the per-quantity shipping preferences set in SellerCloud on the Product level. |
| When changing the customer service status of orders, ask user to enter a merchant note |
You will be prompted to enter a note into a pop-up window. |
| Allow use of replacement SKUs for order items |
It allows you to replace the SKU with a replacement one when needed. |
| Use filter scrollbar when necessary |
Leave it enabled to show scroll when filters do not fit the filter area. |
| Save order download status |
This setting enables a flag on the Order (Downloaded to Shipbridge) when the order is downloaded in Shipbridge and also saves the last time orders were downloaded. |
| Colorize orders with Inventory Available Qty < |
By default, Shipbridge will colorize any orders that have products with a negative inventory. This setting allows you to set higher values for colorizing and to pick the color used. |
| Copy Bill To Phone to Ship To where necessary (requires refresh) |
This setting enables a flag on the Order (Downloaded to Shipbridge) when the order is downloaded in Shipbridge and also saves the last time orders were downloaded. |
| Automatically log off users if system is idle for |
This is a security option to log off the user if no actions were taken for the selected period of time. |
| Download orders on demand |
This setting works when refreshing orders. |
| Stop blacklisted orders |
It prevents blacklisted orders from importing into Shipbridge. |
| Download compact order data |
This setting helps to speed Shipbridge up by pulling in less info from Sellercloud. |
| Fetch user-defined columns for order |
Order custom columns will be added from Sellercloud into the order. |
| Fetch user-defined columns for products |
Product custom columns will be added from Sellercloud into the product. |
| Search for Order Source Order ID in the Order ID filter |
It allows you to search by the channel order ID instead of the one used in Sellercloud. |
| Only load orders from specific warehouse |
When enabled, you can select the warehouse. Shipbridge will only load orders that ship from that warehouse. |
| Filters should not affect previous grid selection |
Changing the filters will not affect the grid selection unless you apply them. |
| Only load orders marked as OK To Ship |
Shipbridge will only load orders with this status. The status can be applied in Sellercloud automatically, manually, or by plugins. |
| Use Experimental Feature |
This setting should be on to use the Use Per Quantity Shipping Preferences option. |
| Include Client User Documents |
These are various custom user documents stored in connection with an order. They may be text, images, or other formats and are imported into SB with the order when this option is selected. |
| Use Product Shipping Preferences |
Read about Product Shipping Preferences here. |
| Include Client User Address book |
Read about Address Book here. |
| Enable Service Highlighting |
When enabled, you can click the Highlight Services button below. You can add services to be highlighted when you calculate rates. |
| Include Target Info |
When enabled, info for Target orders will be fetched with the order info. |
| Include Walmart Specific Order Data |
You can add channel-specific order data for Walmart. |
| Enable Diagnostic Trace |
When a developer needs more info to debug an issue, they may ask the client to turn this one so more detailed logging can be collected. |
| Override with Product SKU |
Shipbridge will recognize the product by its “Product ID” number instead of the “SKU.” |
| Do not download product metadata |
Shipbridge will not include metadata in the product information. |
| Automatically delete request and response files older than days |
Request and response files are logs saved every time a label from a shipping service is requested, and then the response is shown when that label is sent back.
They can be accessed from Help > Output File Locations. |
| Use Product Shipping Preferences |
When enabled, Shipbridge will use the shipping preferences and packaging types configured on your products when processing orders. Product Shipping Preferences are configured in Sellercloud. |
| Skip Product Shipping Preferences per Qty (faster) |
If you have shipping preferences set per qty, this setting must be disabled. If you don’t use per qty shipping preferences, this setting must be enabled. When enabled, Shipbridge will ignore any per qty product shipping preferences. |
Connection Tab
To open the Connection tab, go to Menu > Options > Connection. Here’s where you manage Shipbridge’s connection to your Sellercloud account.
Web Service Connection
To connect Shipbridge to your Sellercloud account or to log in to Shipbridge, you need:
- Web Service URL — The web service URL is similar to your Sellercloud website URL, with one change: delta is changed to ws in the URL, e.g., http://tt.ws.sellercloud.com.
Note: For standalone installations of Sellercloud, the Web Service URL is http://ws.yourdomain.com.
- Username — Use your Sellercloud username.
- Password — Use your Sellercloud password.

You can also change the connection properties from the main Shipbridge screen by clicking the username in the upper right corner of the application and selecting the Logout button. After logging out of the current user, you will be prompted to enter a username and password to reconnect to the service.
Invoice Tab
To open the Invoice tab, go to Menu > Options > Invoice. Here’s where you configure your invoice and packing slip options when printing packing slips from Shipbridge.

To configure the invoice type, select the type and format of the invoice.
| INVOICE TYPE AND FORMAT |
DESCRIPTION |
| Thermal (4 x 6 in) |
Portrait orientation.
Thermal printer. |
| Thermal Landscape (4 x 6 in) |
Landscape orientation.
Thermal printer. |
| Letter–sized (PDF) |
8.5×11.
Laser printer.
InkJet printer. |
Invoice formatting comes from settings in the Sellercloud website. For more information, click here.
| OPTION |
DESCRIPTION |
| Invoice exceptions |
Sets up rules to skip auto printing invoices under certain conditions.
|
| Channel Invoices |
Sets up the printer, invoice and printing types for each channel. |
| Do NOT print invoices when shipping |
Skips printing invoice automatically after the shipping label prints. The invoice can still be printed manually by selecting orders and pressing the Preprint Invoices button.
The option can be used to pick the orders while preprinting all the invoices.
Read here about Sellercloud’s picklist functionality. |
| Skip invoice image downloads |
This setting stops the image of the order’s item from downloading to speed up the invoice printing. |
| Print 2 invoice copies when shipping orders |
Prints a 2nd copy of the invoice.
This option can be useful in case you are going to file a hard copy of the invoice. |
| Use queue: invoices per chunk |
Can be used when printing a series of invoices together. Instead of each invoice PDF being downloaded and sent to the printer individually, invoices can be downloaded in groups and sent to the printer as one job.
The count refers to the maximum number of invoices per group. |
| Print invoices while a batch is running (only select if a separate printer is used) |
Helps speed up the process of invoice and label printing.
Two printers are necessary for this setting to work. |
| Do not allow reprinting invoices |
Blocks invoice printing for orders that already have a status of invoice printed. |
| Save order changes after preprinting invoices |
Sends a notification back to Sellercloud that the invoice for an order is already printed. |
| Auto print invoices on grid population |
When an order is added to the order grid (automatically or manually), its invoice is auto-printed. |
| Print invoices only for multi-item orders |
When enabled, invoices for single-item orders will not be printed. |
| Print API label/invoice on half page (for all companies) |
Prints a label and invoice on letter-sized paper side by side. You can find more info here. |
| Per Company Print Templates |
Sets individual print templates for each company. |
| Print only one invoice for multi-package orders |
By default, invoices are printed for each package in an order. Enabling this setting will allow you to print only one invoice for an order. |
| Use high DPI when printing |
Check this setting to set a higher resolution for invoice printing. |
Sort items by Product ID
|
Enable to ensure the order item list in all packing slips is sorted alphabetically based on Product ID. |
Channel Invoices
You can also set company or channel-specific invoice rules by clicking the Channel/Merchant Invoices Button.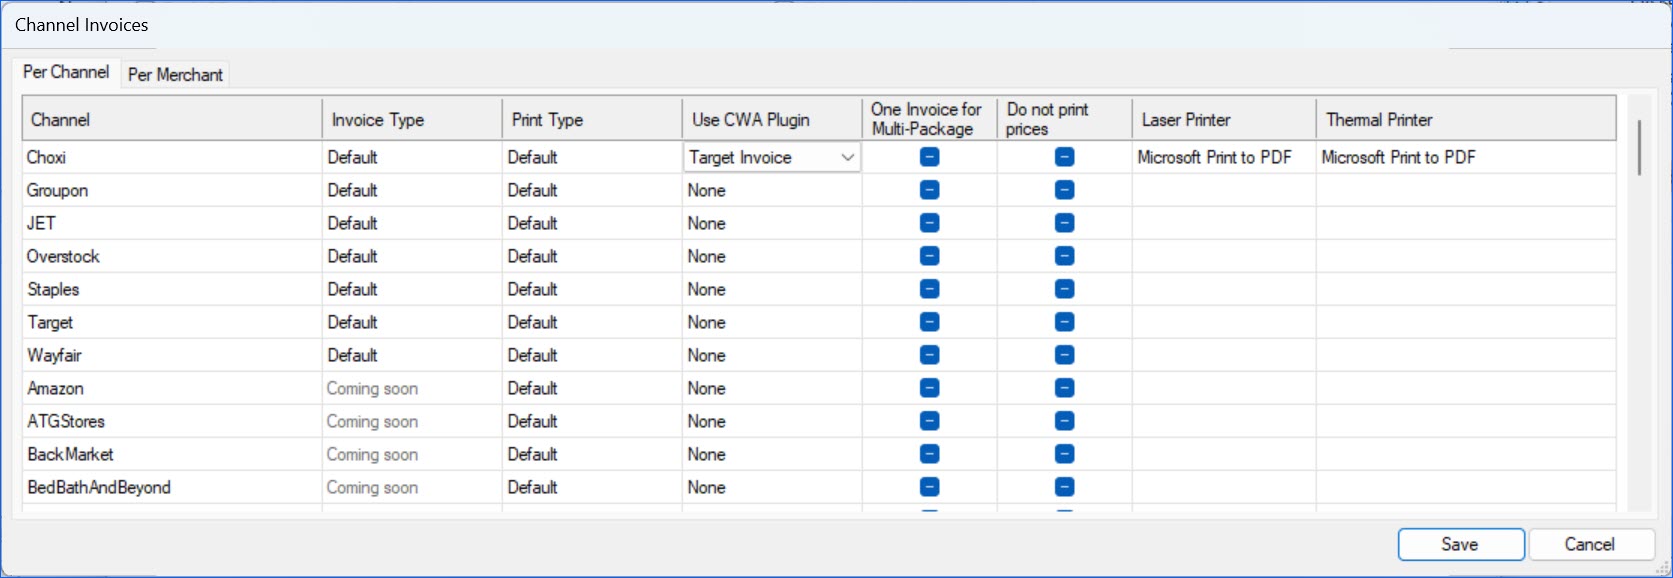
In the pop-up, you will see two tabs: Per Channel and Per Merchant (company). Here, you can configure invoice options that will only apply to the selected channel or company. For example, if you check the Do not print prices box for Channel Wayfair, all invoices for Wayfair orders will be printed with no pricing information, regardless of which company the order came into. You can configure:
- Invoice Type (per channel option only) – select Default or Channel-specific.
- Print Type (both) – Default, Thermal, Thermal Landscape, or PDF.
- Use CWA plugin (both) – if you have custom PDF Invoice plugins installed on your Sellercloud server, you will see them in this dropdown. If one is selected, all invoices for that channel/company will be printed in the format set in the plugin.
- One Invoice for Multi-Package (both) – True or False. Enable to ensure that only one invoice is printed for multi-package orders.
- Do not print prices (both) – enable to exclude pricing information.
- Laser Printer (both) – select a Laser printer.
- Thermal Printer (both) – select a thermal printer.
4×6 Invoice Options
When using the 4x6 invoice, you can configure settings for whether to include a gift note, location notes, shipping service, etc. 
Letter-sized Invoice Options
If you select a Letter-sized invoice type, you can set the details for what to display on the invoice in your Sellercloud portal by clicking the Edit Invoice Preferences link.
| OPTION |
DESCRIPTION |
| Printer is thermal (4X6) |
Allows the invoice configuration options from Sellercloud to print on a thermal label. |
| Download PDF invoices in one file |
When shipping multiple orders at once, invoices will be downloaded all in one file instead of one at a time. |
| Download PDF invoice immediately |
Check this setting to speed up the printing of the invoice. |
Select the Printer
To run a test print of your invoice, first select the invoice printer, then make sure your printer conforms to the invoice type selected above. The printer used for invoices can be different than the one used for shipping labels, but it doesn’t have to be. For example, the printing options can be set so that the shipping labels and invoices for a given order will print consecutively, coming out of the printer two by two.
Invoice Exceptions
The Invoice Exception option allows you to set up rules to skip auto-printing invoices under certain conditions. This is generally used when you only want to print for channels that require a packing slip.
Note: Invoice Exceptions will not apply when printing Half Label/Half Invoice.
An invoice exceptions window can be used to set either one or multiple exceptions. You can delete configured exceptions one at a time or all together.
To set an exception:
- Click Invoice Exceptions.
- Click Add exception.

- Select the Exception Type – whether the skip rule depends on a Carrier and Service combination or a Company and Channel combination.
- Configure the ruleset to skip printing.
- Click OK to save the rule to the grid.

Shipping Tab
There are numerous settings controlled on the Shipping tab.
To open the Shipping tab, go to Menu > Options > Shipping
The table below shows which shipping program will be used for each carrier and order type (domestic or international) based on the Shipbridge settings. 
Click here to see a description of the settings
| SETTING |
DESCRIPTION |
| Save non-trackable numbers to a separate field |
Saves non-trackable tracking numbers in a separate field in the Order object. These tracking numbers are USPS First Class tracking numbers that start with 0. |
| Always prompt after each shipping (not applicable in Scan&Ship) |
When shipping multiple orders via the grid, display a prompt whether shipping should continue with the next order. |
| Require exclusive shipping lock, Shipping lock duration (min) |
Will place an order in a locked state for a set duration of time once the shipping process has been initiated by a shipper. This will prevent double shipping orders from another shipping station. |
| Use senders phone when none other is specified |
Can be used when a phone number is required for the delivery address. It will place the sender’s phone number if no other phone number is available. |
| Populate package dimensions in shipping label requests |
When a package type has been selected, the dimension of the package type can be auto-populated in shipping label requests. |
| Require dimensions for orders |
The system will send notifications for orders where dimensions are not specified. |
Exclude kit parents in Package Manager
|
Prevents kit parent products from remaining in a package when the components have been moved. |
| In Package Manager generate a separate package for each bundle item |
When loading the package manager for an order, automatically generate a separate package for each order bundle item. |
| Clear Overstock phone number |
SellerCloud integrates with the Overstock marketplace. When this setting is enabled Overstock phone number will be cleared from order information. |
| Only offer USPS services for US territory destinations |
If you want ShipBridge to only offer USPS services for US Territories, this can be set here. |
| Only offer USPS services for POB destinations |
If you want Shipbridge to only offer USPS services for POB destinations, this can be set here. |
| Allow aggregator services for POB (UPS Mail Innovations, FedEx SmartPost, DHL Global, UPS SurePost, DirectLink) |
Will allow shipping to PO Boxes via aggregator services, no-postage services/carriers. |
| Only restrict selection for orders with PO Box in Address line 1 |
Will restrict the selection of orders with PO Box in Address line 1. This setting works together with Only offer USPS for POB destinations. |
| Show how much customer paid for shipping (on Calculate Rates form) |
When selected, on the Calculate Rates form, it will be shown how much the customer paid for shipping. |
| Warn when a shipping rate is more expensive than what customer paid |
The system will show a notification that a shipping rate is more expensive than what the customer paid. |
| Warn if customer paid $0 |
Will warn the shipper if the customer paid $0 for shipping. |
| Validate all addresses in ShipBridge before shipping |
All addresses will be validated automatically before shipping. |
| Validate addresses without suggestions |
The address will be validated without suggestions being given. |
| Do not overwrite secondary address information |
The address validation overwrites the second address. When the setting is enabled, the address won’t be overwritten. |
| Automatically set weight to 1 oz when an order is > 0 oz and < 1 oz. |
All weights will be set to 1 oz when order is > 0 oz and < 1 oz. |
| Set default order weight (when 0 oz) Single-item/Multi-item orders |
Chosen default order weight (when 0 oz) will be set for all single-item/multi-item orders. |
| Require PIN before shipping orders with order total > $ |
The system will require PIN before shipping with defined order total. |
| Reference fields: Use product name instead of order item description |
When the reference type “(W/BUNDLE) QTY – LOCATION NOTES – PRODUCTNAME” is used, enable this setting to use the product name instead of the order item description. |
| Silently validate addresses with standard changes (ZIP+4, abbreviations) |
The system automatically validates addresses with standard changes (ZIP+4, abbreviations) without additional user actions. |
| When using multiple warehouses, deduct inv qty from proper warehouse (based on location) |
It will help to associate inventory reductions from a station to a specific warehouse in SellerCloud. |
| Use company first/last names instead of company name |
The company first/last name specified in SellerCloud will be used instead of the company name in all payment actions. (e.g. on printing labels). |
| Always recalculate order weight based on product/item weight |
When setting is enabled:
- Single-item orders pull from the ship weight of the product.
- Multi-item orders calculate the total weight based on the product weight of all the products.
When the setting is not enabled, the weight on the order – Est. Shipping weight on the Shipping Tab – will be used. The Est weight is provided by the sales channel and can often be inaccurate. |
| Ignore zero-weight products when calculating package and order weight |
Zero-weight products will be ignored when calculating package and order weight. |
| Warn when shipping an order with $0 declared value |
The system will show a notification that an order has a $0 declared value. |
| Use old package editor code |
Will enable the use of legacy way of Editing packages on the order. |
| Only update Ship Weight when saving order/product weights |
The weight will be saved only when edited from Menu > Save Weights back to Products. |
| Allow batch unshipping |
Shipbridge will allow the shipping of multiple orders at once. |
| Calculate order weight based on kit items |
A kit’s weight will be calculated based on the weight of all components. |
| Calculate per-package weight for multi-package orders |
For multi-package orders, the weight will be calculated per package. |
| Use full Overstock address when overriding Ship From address |
Overstock address will be used for the Ship From address. |
| Use 4×6 label for PDF labels printed by API carriers |
This is a setting used when printing labels to a half-label Half invoice; instead of filling half the letter size page, it prints it as a 4×6. |
| Use 4×6 collate |
This is a setting that should be enabled in tandem with the previous one – Use 4×6 label for PDF labels printed by API carriers. Collating documents creates consistency in printing copies. |
| Hide the shipper phone number where possible |
The shipper’s phone number will be hidden from the label. |
| Include the customer name in the UI order log |
The customer name will be shown in the UI order log. |
| Add “Confirm orders” context menu shortcut |
Confirm orders context menu shortcut will appear on the Menu. |
| Show buttons to refresh existing, and download new orders |
Buttons to refresh existing, and download new orders will be shown in the Order Grid Area. |
| Consider Address Classification from CWA |
Address Classification from CWA (Sellercloud) will be pulled into Shipbridge. |
| After shipping, automatically clear and focus the Order ID filter |
Order ID filter will be automatically cleared and focused after the selected order was shipped. |
| Use per-package signature confirmation (Requires restart) |
For multi-package orders, the regular Signature Required check box on the order will be hidden. Instead, configure the signature from the main grid by expanding the order or by using the “Edit Packages” (also available on Scan & Ship). |
| If there is only one result in the grid, auto-select “Mark for Shipping” |
If there is only one result in the grid, the order will be automatically marked for shipping. |
| Use CWA package type dimensions where available |
Dimensions selected in the Sellercloud (CWA) will be applied in the Shipbridge. |
| Shipped tab: Skip order redownload |
The order won’t be redownloaded to the grid if it is already present. |
| Default grid insurance type |
There, you can select the default insurance type: Carrier or Third Party. Note: If you set Third Party, this will not affect the order in Shipbridge. |
| Only allow shipping of orders loaded from picklists |
Only orders loaded from picklists will be allowed for shipping. To learn more about picklists, go to the link. |
| Require PIN for Delivery and Signature Confirmation changes |
Requires entry of admin pin to allow Delivery and Signature Confirmation changes. |
| Save declared value back to CWA/database |
Values declared in ShipBridge will be saved back to SellerCloud. |
| Use Warehouse Address (based on Location and Station) |
The warehouse address will be printed as the return address. |
| Disallow USPS shipping for Amazon orders going to Mexico |
Will restrict Amazon orders going to Mexico from USPS shipping. |
| Skip CWA/WS–side shipping rules |
Some shipping rules can be set back in SellerCloud (CWA). This setting will have them ignored. |
| Print 300 DPI shipping labels (ZPL format) |
Will enable ZPL format for shipping labels. |
| Print channel specific documents |
Some sales channels need to print a required packing slip. When the setting is enabled, these documents will be printed together with invoices. |
| Trim phone numbers over 10 digits |
Phone numbers will be cut to a standard 10-digit format. |
| Remove non-numeric characters from phone numbers |
All non-numeric characters will be automatically removed from phone numbers by the system. |
| Strip/replace diacritic characters in ZPL |
Zebra Programming Language (ZPL) is a page description language from Zebra Technologies that is used primarily for labeling applications. The setting enables to strip/replace diacritic characters from code. |
| Rotate laser printed labels in landscape |
All laser-printed labels will automatically have a landscape orientation. |
| Use billing phone if over 10 digits |
If the phone named in the order is over 10 digits, the billing phone will be used. |
| Replace generic Amazon phone # with company phone. |
Generic Amazon phones will be automatically replaced with a company phone. |
Batches Tab
To open the Batches tab, go to Menu > Options > Batches.
On the Batches tab, you can configure multiple file printing options.
Customs Tab
Shipping an international package typically requires completing a customs declaration with additional sender and product information. Sellercloud makes that easier with a number of settings to set default values in the customs form.
To open the Customs Tab, go to Menu > Options > Customs.
Carriers Tab
Shipbridge integrates with multiple carriers. You can find information about configuring settings for them in the following articles:
Shipsurance Tab
Shipsurance offers shipping insurance coverage for packages sent through major shipping carriers worldwide. With Shipsurance, businesses can easily insure their shipments that originate from the USA or Canada, so they are financially compensated in case of loss, damage, or item shortage.
Shipbridge core software supports a base integration with Shipsurance. If you wish to extend your Shipsurance functionalities, request an additional billable plugin via Sellercloud Support.
To open the Shipsurance tab, navigate to the Shipbridge Menu > Options > Shipsurance.

Check Enable Shipsurance, to display the Shipsurance settings:
- I have agreed to the Terms and Conditions – Click on See terms and conditions and read carefully Shipsurance terms of use. If you accept their stipulations, check the I have agreed to the Terms and Conditions box.
Once you check the Enable Shipsurance setting and agree with their Terms and Conditions, press Save, and your future shipments will be automatically insured by Shipsurance. Carrier insurance is automatically disabled.
To reject Shipsurance terms of use, navigate to Options > Admin > Reject Shipsurance Terms & Conditions.
- Automatically void insurance when refunding postage – If you enable this setting, whenever a Shipbridge postage refund is processed, Shipsurance will automatically void the associated insurance.
- Use production server – Shipsurance provides you with a Sandbox environment for your account’s test setup. Check this setting to establish a connection between your Shipbridge and your Shipsurance production server. Once enabled, the Shipsurance service becomes active.
- Apply Shipsurance when the order’s cost is over … – If you wish to apply insurance to shipments above a specific cost, check this option and select a threshold in USD, under which no Shipsurance is purchased.
- Include international orders – Enable this option if you wish to purchase Shipsurance insurance for international orders. Keep in consideration that your shipments need to start from either the USA or Canada. Also, note that shipments to specific destinations are not eligible for Shipsurance insurance coverage – refer to Shipsurance coverage page for more details.
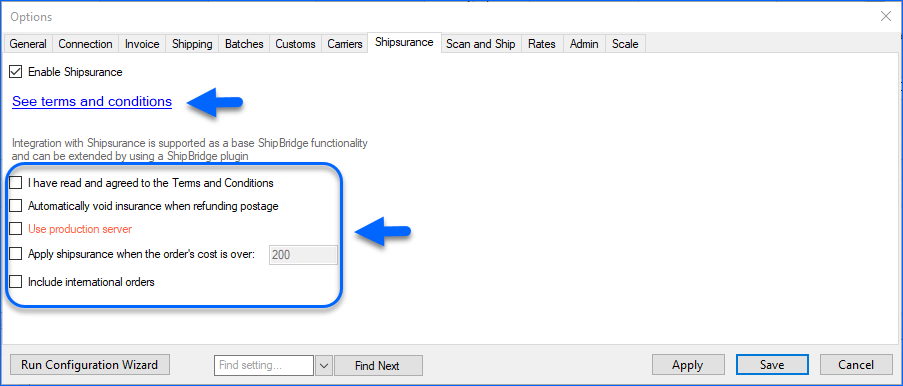
Click Apply, then Save to implement the desired configuration.
When Shipsurance is activated, it assesses the declared value of an order and then verifies whether the option Apply Shipsurance when the order’s cost is over… is enabled. If the total declared value surpasses the specified threshold, Shipsurance is procured. Additionally, Shipsurance examines whether an order is international and whether the Include international orders option is activated. If the setting is disabled, no insurance is purchased for international orders.
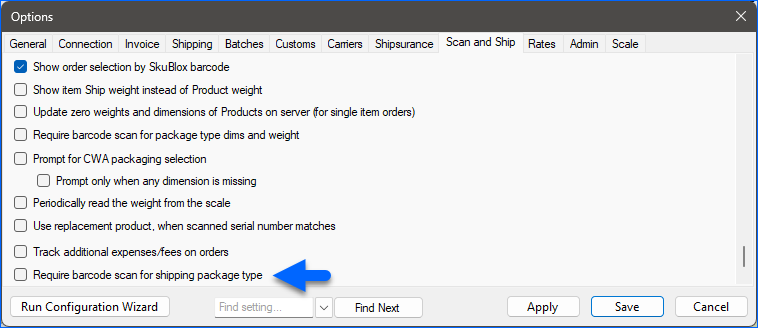
Scan and Ship Tab
To open the Scan and Ship tab, go to Menu > Options > Scan and Ship.
On the Scan and Ship tab, you can configure a number of settings.
To make shipping package barcode scanning a mandatory step in the
Scan and Ship workflow, check the
Require barcode scan for shipping package type box.
Scan and Ship Mode (Disable the Grid)
- Select the option to Disable the grid (only allow Scan & Ship).

- You will see Scan and Ship mode. This lets you ship a single order at a time.

Scan the Same Item With Multiple Quantities
If you have orders with large amounts of the same item, you can enable the setting Allow scanning of multiple qty to scan the item only once and then enter the quantity.

Automate the Printing of Shipping and Confirmation Labels
To increase speed and use fewer clicks when printing shipping or Confirmation Labels, select these settings on the Scan and Ship tab:
- For printing shipping labels — Scan items and Ship Orders
- For printing confirmation labels — Use Confirmation Code process to scan items. Also, select a printer for the confirmation labels
- Skip product scan in Scan & Ship mode
- Use single-scan shipping
- Require Scan & Ship for multi-item orders
- When scanning a SKU to load an order, mark the product as scanned
- Focus the Ship & Print button instead of barcode

Rates Tab
To open the Rates tab, go to Menu > Options > Rates.
On the Rates tab, you can configure a number of settings.
Complete your API credentials for each carrier you ship with and click Save.
Import/Export Credentials From/To Sellercloud
If shipping carrier credentials were configured in Sellercloud (Settings > Company Settings > Company > Toolbox > Shipping API), you can import them into Shipbridge by clicking the Import from CWA Company Record button.
You can also export credentials to Sellercloud using the Export to CWA company Record button.

Customize Rates
Some carrier rates, such as for DHL eCommerce (Global Mail) and UPS Mail Innovation (UPSMI), cannot be obtained by API. Instead, these are brought into the Rate Calculator by importing their rate charts.
These UPSMI rates are just a sample; everyone must request one from UPS and import it into Shipbridge.

Note: By enabling Only show rates from the custom tables (ignore APIs), only carriers with custom rates will be shown in the Rates table.
